Blog Post: Canvas Supported Fonts for Assignment Submissions

Canvas supports a variety of font types that can be previewed in Canvas, it also supports previews for documents up to 100 MB and 999 pages. When documents are viewed in Canvas, fonts are often converted from their original type face into a font that is supported. It is important that assignments submitted to Canvas use one of the supported fonts listed on their website:

The majority of work submitted to Canvas will use standardised fonts such as Arial, Calibri or Times New Roman. However assignments submitted using unsupported fonts risk having their work reformatted which could impact on the grade awarded. Please ensure that submitted work uses one of the recommended supported fonts.

If the document exceeds 30MB and the document is not previewing as expected in Canvas, please try to download the submission before viewing. Please contact your tutor if you suspect your document has changed after submission.

Help and Support

For further help and support with your submission, please see the Assignments section.


Blog Post: Creating Accessible Powerpoints (Staff)

This guide advises on best practice for accessible PowerPoints. It makes suggestions you can implement when designing slides, sharing files, or during live presentations. The information is gathered from several agencies that promote good accessibility and good practice drawn from across the sector.  

Cognitive Load

Cognitive load theory is essential for you to understand, as it provides critical insights into how students mentally process new information. By comprehending the limitations of working memory and designing slides focused on minimising extraneous details, academics can greatly improve learning outcomes. Thoughtfully integrating techniques like the signalling principle and dual coding can unlock students’ cognitive load, enabling more effective processing of the new concepts you are teaching them. An awareness of these key principles allows you to create presentations that are more impactful, efficient, and engaging for your pupils. Useful introductory to cognitive load theory

Using Colour 

  • Use single-colour backgrounds. Avoid background patterns or pictures and distracting surroundings. 
  • Use of ‘off-white off-black contrast’ for background and text. Multiple individual factors including lighting in the environment/situational and the nature of the visual/cognitive impairment mean that it is impossible to arrive at one colour combination that all prefer. Off-white and off-black contrasts are best practices. Changing contrast using the master slide can be useful if the ambient light in the room makes it harder to read. Having a dark background colour with off-white text is just as useful as a white background with off-black text.  
  • Avoid using colour as the only indicator: If you want to draw attention to something use more than colour to highlight it e.g. the colours in a graph. To make information more accessible, differentiate it in more than one way. For example: 

    • use both colour and text to mark up different chart elements. 
    • use patterns on graphs to distinguish between different elements. 
    • Avoid red and green contrast red/pink, as these colours are difficult for those who have colour vision deficiencies (colour blindness).  
    • Avoid using a traffic light system to categorise content or use red to highlight important information. 

Reading order 

  • Try not to add too many additional text boxes. PowerPoint files create a reading order. This is useful for allowing screen readers to move through the file reading out the next logical item in the series. Care must be taken in the design of the template so that the reading order is logical, for instance, the title of the slide is read before the main section. You can also remove decorative items from the reading order: 

Text 

  • Left align text, without justification
  • Avoid centred text for multiple lines of text. This is where all lines of text are arranged down a centred line rather than ranged to the left.  

This is  
really hard to  
read so please 
don’t do it 

  • Avoid multiple columns for text (as used in newspapers). 
  • Lines should not be too long: 60 to 70 characters maximum. 
  • Use white space to remove clutter near text and group-related content. 
  • Apply the “6 by 7” rule: only 6 words per line and 7 lines per slide. 

Font size 

  • 28 point is recommended as a minimum. This is complicated by the environment within which you are viewing the text. A large lecture room with a small screen will mean text will appear smaller at the back of the class. 

Font typeface 

  • The typeface you select can have an impact on how legible and accessible your text is. 
  • San serif fonts are best for the web. These are without the curly elements that can lead to words being misread.  
  • The lowercase letter ‘a’ can be a problem because it doesn’t appear as it would be written this may be a reason to select a particular font such as Cavolini. 

  • Don’t use Times Roman. This can be confusing as it can join letters together making it harder to read. 
  • Avoid italics 
  • Avoid underlining – except where there are hyperlinks 
  • Avoid ALL CAPITALS or text That Capitalises the First Letter 

Alt Text 

Alt text helps people who use screen readers to understand what’s important in the visuals in your slides. Visual content includes pictures, SmartArt graphics, shapes, groups, charts, embedded objects, ink, and videos. 

Use alt text to briefly describe the image, its intent, and what is important about the image. Screen readers read the description to users who can’t see the content. 

Using PowerPoints ‘Design Ideas’ 

PowerPoint has an inbuilt tool that shows the slide creator, different slide layouts, colours, backgrounds, fonts and typefaces. 

  • Beware – not all of these are accessible. Although this is a step forward in terms of offering ‘good’ design to the novice slide creator there are some rules users need to be aware of, many of which are touched on in this document.  
  • Standard design, cognitive load and boredom threshold. Using a template may help to provide familiarity, and a sense of belonging and reduce cognitive load because the student is not required to learn the layout of the new slide. However, there is also a negative aspect that connects with ‘death by PowerPoint’ that could connect with this idea of everything looking the same. Design ideas in PowerPoint could offer a change from the norm, possibly heightening interest.  

Sharing Powerpoints

  • Share the file before the presentation: Sharing the file prior to the presentation is useful to allow those with a specific need to read through for preparation, to change the slides to meet their needs, or print them. The immersive reader embedded within many Microsoft products is beneficial to users who may want to adjust the text size, have the content read out, or adjust the colour settings. 

  • File format: Please use the original PowerPoint file format to maximise the flexibility and access to the details rather than a PDF.  

Accessible Presentations

  • Recording your presentation: This will allow students to review the lecture to improve understanding.  
  • Make it active: Consider using a classroom voting system to allow students to express perceptions around the topic, test their knowledge, or ask questions.  
  • Live translation: Consider turning on subtitles and alerting students to translation via mobile 

Further guidance 

Acknowledgement 

This guide builds on elements of best practice recommended by: 


Blog Post: VLE Guiding Principles

This is a list of guiding principles for the use and development of the VLE. 

These principles need to highlight particular fundamentals about the use of the VLE and protect it from a diversification and proliferation of roles. It also needs to highlight its distinctiveness within the institution to prevent duplication by other services. Therefore, it is defined by what it is not, as much as by what it is.  

Certain developments have occurred in the past which did not follow this proposed central function, such as utlisation of the space as a deployment platform for the results notification day. The line is subtle in its distinction. For instance, programme sites became a space to display BoS minutes to students, which detail the outcomes of module evaluation. This is clearly a more managerial function, updating students on the on-going improvements to the programme. However, the VLE is also the place where students fill out their module evaluation surveys and where staff also access the results of these surveys. The distinction between them is a principle of being within the process of delivering and ‘taking’ that course, rather than at the end point of discussing the conclusions of it. Therefore, the first principle is formed around the idea of being within the moment of delivery.   

Principle 1: Encompasses the preparation and delivery for the learning experience. 

Statement: 

The VLE is a virtual space that encompasses the construct of educational materials and activities, and the process of learning from those up to the point of student module feedback.  

Rationale: 

This defines both the purpose of engagement, that of learning, and the start and end point of that process.  

Implications: 

  • The VLE does not extend beyond the point of the assessment of the learning experience and the learner’s assessment of the curriculum. This excludes processes of formally recording their record of achievement, as this is seen as being outside the process of learning. It also excludes the storage of data which does not pertain to the delivery of and engagement with the curriculum.  
  • This principle acknowledges that both staff and students may use the space to reflect on the learning experience through module evaluation and data on learning but the formal process of Boards of Study take place external to this system.   

Principle 2: Pedagogic space for the learning experience 

Statement: 

As custodians the TLA determine the organisation and delivery of LJMU programmes of study within the VLE, facilitating the access and connection between staff and students, and their curriculum.  

Rationale: 

To control the extent of the variety of purposes VLE learning spaces may be used and the reasons for developing additional spaces within the institution.  

Implications: 

  • The VLE is to aid teaching. This system is to support the construction, presentation and delivery of an educational curriculum. Content and activities which are not directly related to the support of emergent learning by students will need to be considered by the custodians of the VLE prior to any implementation 
  • Ad hoc spaces may also be constructed in order to enhance or augment the delivery of the learning experience. Without this principle, exclusions, favouritism, and inconsistency would rapidly undermine the management of information. 
  • The VLE does not extend beyond the point of teaching and learning and should not be used for non teaching related departmental or administrative purposes. This is to ensure that the core opertation of the VLE remains fully supported and resourced. 

Principle 3: Access to spaces 

Statement: 

LJMU staff and students will be able to access the VLE and be provided with appropriate permissions to either construct or facilitate the learning experience, or undertake programmes.   

Rationale: 

To control the access of the VLE to outside parties who are not formally members of LJMU or designated partner colleges.  

Implications: 

  • The VLE should allow designated LJMU staff to create online spaces to deliver learning to LJMU staff and/or students.  

  • Any LJMU staff member or designated student should be given the access rights to facilitate a learning programme if required.  
  • Designated partner colleges will be able to use the VLE functionality, but may not have licence to use other connected services because of particular licence agreements with those third parties.  

Principle 4: Content to support the learning experience  

Statement: 

The VLE is for the display of content which supports the student learning experience. 

Rationale: 

This principle is to prevent the VLE from being seen a communication tool for any information which the institution wishes to disseminate that falls outside of the direct needs of learners undertaking their programme of study.   

Implications: 

  • The staff or students who are facilitating the learning within the VLE are the custodians of the content with which they promote learning with their students. Extraneous information which is not directly related to this programme of study should use alternative routes to communicate with the student body.  


Blog Post: Login issues with Panopto recorder

Occasionally staff and students who are using the Panopto recorder may find it difficult to log in on an LJMU laptop or computer. This is usually caused by the Panopto record not being used on that particular PC.

To resolve this

  1. Open the LJMU app player.
  2. Search for ‘Panopto’
  3. Click and open ‘PanRepair’ – This will remove the old instance of the software.
  4. Then click and open Panopto recorder to reinstall the recorder
  5. This should fix the issue

Staff guide: Panopto

Student guide: Panopto


Let’s get Quizzical!

We know that a lot of hard work goes into creating and delivering quizzes. Whether you have one quiz, or several with question banks, here are a few tips to save you time when creating your quiz in canvas.

Use Question Banks

It is much easier to re-purpose questions if they exist in a question bank. If you intend to use questions in other assessments e.g. referral assignments, formative tests etc, questions should be placed into a bank. Once you have created your quiz, question banks can either pulled directly into your quiz or placed into a question group. Question groups allow you to pull questions from several banks randomly allowing you to specify how many questions from each bank. For more information on how to create a question bank and add this to your quiz, please see the following guides:

Copying Quizzes

As mentioned above, it is much easier to re-purpose questions if they have been added to a question bank. If however you have a quiz that already contains a direct set of questions, you can export and import a QTI zip file to duplicate your quiz.

QTI exports do not include question banks. If you would like to duplicate a quiz that contains a question bank, you must export the course, and import selecting both the quiz and question banks options.

Important: Please note importing a quiz with a question bank more than once to the same cause will cause the quiz to not work. 

Moving/Copying Questions between Banks

Questions can be moved or copied from one bank to another. For more information on how to copy or move questions, the following Canvas article may be of use:

How do I move/copy a question from one question bank to another?

Allowing Students Additional Attempts

There might be an occasion when you need to allow your student another attempt at a quiz. The following Canvas article will show you the different ways in which an additional attempt can be provided to an individual or the entire cohort:

Once I publish a Quiz, how do I give my students extra attempts?


Blog Post: Quick Links To Canvas Support

Canvas Technical Support

If you are experiencing a Canvas technical issue or require user guidance, please raise this with Canvas 24/7 Support, in the first instance. If Canvas Support are unable to resolve your issue, they will automatically assign your request on to the Teaching and Learning Academy (TEL Team) helpdesk.

Canvas 24/7 can offer support with:

Raising a Support Request with Canvas

Canvas support is available 24/7 for both staff and students. Help can be accessed from your Canvas navigation menu.  When you click the Help button you will be presented with the following support options:

Log a ticket with Canvas Support: Log a ticket with the 24/7 helpdesk. Normal response time up to 1 hour.

Chat with Canvas Support (Staff): Raise a live chat with a Canvas Support operative. Normal response time within 2 minutes.

Canvas Support Hotline (Staff): Call and speak directly to a Canvas Support operative. Normal response time within 1 minute.

Support for Non-Canvas Platforms in the VLE

If you are experiencing any issues with the following, please raise a ticket with the Teaching and Learning Academy, via LJMU HelpMe:

Please note, LJMU helpdesk requests carry a service level agreement (SLA) of 3 days. Depending on the nature of the request, the Teaching and Learning Academy may need all of the time available in the SLA to resolve your issue.  Please always log a helpdesk request for TEL support rather than emailing members of the team or the TLA directly, as these requests may not be resolved within the SLA.

Student Enrolment Queries

Before raising a ticket, please ensure that the student has an active module enrolment in SIS.  If they are correctly enrolled and the student can still not see the module in Canvas, ask the students to check their course enrolments in Canvas.  Guidance on how to find a particular course can be found in the following student guide: Course Enrolments.

If after reading the guidance the problem persists please raise a helpdesk ticket with the Business Support team using LJMU HelpMe.

Managing your Module Enrolments (Staff)

Current member of staff: If you are a member with a staff email address (it does not contain a year), you can use the My Canvas Admin tool available in your Canvas Account area, to add yourself to and remove yourself from modules.  Please read guidance on My Canvas Admin.

New member of staff: If you are a new member of staff and require access to My Canvas Admin, please log a request via and include one complete module code (example 7001ACADEM-202223-SEM-1) of a course you require Tutor access to. You will be added to this module and the link to My Canvas Admin will then be available. Alternatively, please ask another Tutor already enrolled on the module to add you via the following guide: My Canvas Admin – Add Course Users.

Adding a PGR or Notetaker to a Module

A member of LJMU staff is required to raise a helpdesk ticket on behalf of the PGR student or Notetaker.  Please submit the complete module code (example 7001ACADEM-202223-SEM-1), their LJMU email address and specify their role (Teaching Assistant or Notetaker) to the helpdesk ticket.

Other useful guidance

A-Z of learning tools

Things to think about

Browse by theme

Training


Blog Post: Adding Images and the Removal of the Unsplash tool?

Canvas have removed the plugin to import images directly from Unsplash into your Canvas course. For more information regarding this change please read Unsplash images changes. There are lots of other ways to add images to your content, you should be mindful of copyright and ensure the image is either marked as ‘decorative’ or provide Alt text for accessibility.

Copyright

When finding images you need to check whether there are any copyright restrictions attached to the image before using it.

You may wish to read Guide to Copyright and Images located within the Images section on the copyright advice for academic staff page.

Creative Commons images have been licensed to use for a variety of purposes.  Using Creative Commons material is a great alternative when it is not possible or practical to get permission from the copyright owner.  

Sourcing images

There are various ways to source copyright free images for your Canvas course, a few options are listed below.

Google Images

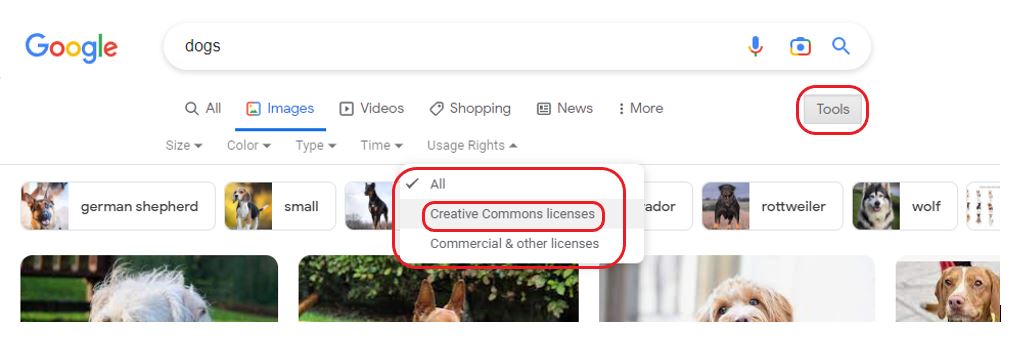
You could simply use Google Images.  When searching images within Google select the Tools button and under Usage Rights select Creative Commons licenses.  

Image highlights locations of Tools button and Creative Commons licenses button

When searching you will now see the licensable icon on searched images.  You can view license details of individual images by clicking on licensable icon and then clicking on license details. 

Licensable icon.

Pexels

All photos on Pexels can be downloaded and used for free, details of images and how they can be used are held within Pexels legal information. Some sponsored images on this site have different copyrights,  avoid accessing the sponsored images.

Creative Commons – OpenVerse

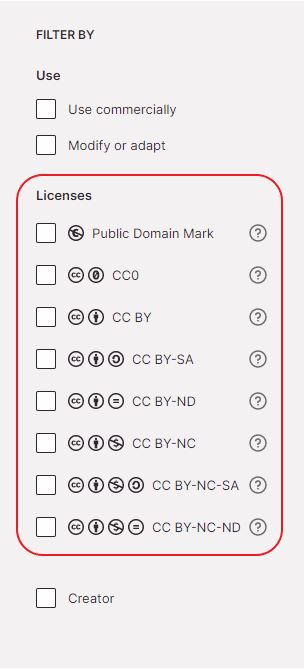
You can search Creative Commons images by using Openverse.  Openverse allows you to filter by Creative Commons license.  Learn about the Licenses Creative Commons offers.  

Images highlights different licenses options available.

Unsplash

Unsplash is still available to use, please familiarise yourself with Unsplash license details.

Attributing images

When using third-party images, it is essential that you give a full acknowledgement or attribution
of the source.

For further guidance on how to reference images please read How to Give attribution guidance on the creative commons website.

How to embed images onto a Canvas page

Guidance on how do I upload a file to a course can be used when uploading images to a Canvas course file area.

Please view how do I upload and embed an image in the Rich Content Editor to see instruction on how to add an image to Canvas page.

Read instructions on how to manage alt text and display options to ensure your image is accessible.

Further Help and Support

If you need help and advice on how to embed an image in your course, please contact Canvas support who are available 24/7 to answer your queries. Simply access the ‘help’ section in Canvas.

Useful information

Accessibility blog posts

Accessibility statement

Copyright advice for academic staff

Copyright advice for both LJMU students, staff and researchers

Making your content accessible

Staff Guide Images

Staff Guide Making images accessible


Blog Post: Canvas Updates

Tis the season for gifting and the masterminds over at Canvas have been busy creating some nifty new features for you to use. Here are some of the new tools you can find in your Canvas course:

Student Feedback Visibility Update

In the Grades page, placement for grades, rubrics, and comments have been updated. The score column displays the assignment score and total score in a single column. Additionally, students view an unread indicator (blue dot) on the feedback button when a new comment is added to an assignment or a rubric, and comments display in a pop-out comment tray.

The grades page now containes the score achieved and the total score, a blue circle icon denotes that new feedback is available for both rubrics and comments.

These updates improve the visibility of assignment scores and new feedback comments for students. Additionally, the updated comment display allows students to view the comments alongside a submission.

The comment/feedback panel now pops out in the grades page.

Text Editor Word Count

This update provides users fast access to view a detailed view of the word count. The word count displays both information for the page and for any highlighted text. To view a detailed word count in the Rich Content Editor from the status bar click the Word Count.

Canvas text editor which contains the toolbar and the status bar which contains the word count tool. Accessing the wordcount tool will propvide more detailed information on the page or selected text.
Word count page displays the number of words, characters (no spaces), characters for both the document and a selection of text.

Rich Content Editor Drag and Drop

This update provides users with additional options when adding content to the Rich Content Editor (RCE). You can now copy and paste an image from a browser or photo viewing app in the RCE. You can also copy an image, audio, or video file from a file system directory viewer such as the macOS Finder or Windows File Explorer and paste it in the RCE or drag it.

When dragging and dropping an image from the web, an HTML IMG tag referencing the file at its location on the web is inserted into the RCE. This may or may not display the image for other users depending on the public visibility of the source image.

Icon Maker Updates

If you’ve not already used the icon maker, head on over to our blog to find out how you can use this in your course: Blog Post: Introducing the new Canvas Icon Maker (Staff)

This new update provides instructors more device options for customization of icons in the Rich Content Editor Icon Maker. 

Custom Images

You now have the option to add your own images for icons in the Rich Content Editor (RCE) Icon Maker. When adding an image in the RCE, instructors can choose Upload Image or use Course Image.

After uploading your image the icon maker, there are a range of cropping options.
Cropped image displays 1. pre-formatted options for cropping, rotation by degree, rotation by 90 degrees and a zoom option.

After uploading your image, you have the option to crop the image using a range of tools. There’s also a reset button.

Cropping Images on mobile devices

A cropping tool has been introduced for touch devices, simply open the RCE Icon Maker and create or edit an icon.

Crop window for icon maker images on a touch device.


Blog Post: JISC Insights Survey Pilot (22-23)

LJMU is running a pilot project to increase our understanding of the level staff and students’ digital capability. The aim of the project is to see if the JISC digital capability insights survey helps to reveal new insights that lead to new or support current initiatives to support our staff and students’ digital capabilities.  

What is digital capability?   

Digital capability is the term JISC uses to describe the skills and attitudes that individuals and organisations need if they are to thrive in today’s world. At an individual level we define digital capabilities as those which equip someone to live, learn and work in a digital society.  

The 6 elements are:   

  • Digital proficiency and productivity (functional skills)   
  • Information, data and media literacies (critical use)   
  • Digital creation, problem solving and innovation (creative production)   
  • Digital communication, collaboration and participation (participation)   

  • Digital learning and development (development)   
  • Digital identity and wellbeing (self-actualising)   

What is the JISC Insights Survey? 

We are using the JISC insights survey tool, which has been designed over a number of years and iterations to help understand an individual’s digital capability. JISC is a not-for-profit, UK-based organisation. They have been helping institutions develop their response to the increasingly digital world. The JISC Digital Insights Survey has been used widely with UK institutions over a number of years. Please watch this short video to help you understand the process.   

Digital experience insights 2022   

The survey contains 34 questions, covering the 6 elements, to provide a well-rounded appreciation of our collective digital understanding.  

Why are we doing this? 

The aim is to support departments and the institution to develop or modify initiatives to support any areas of concern highlighted from the data. The survey data is also benchmarked with the other participating institutions. This helps us all to see where the institution is compared to the sector.    

This survey is NOT for the purpose of monitoring any individual’s digital capabilities. The survey reports on the departmental level and not the individual. This is to help identify and support teams and cohorts of students to thrive in the online environment.  

Scope of the pilot? 

The pilot is work with selected groups of staff and students. The scope of the pilot would be to distribute the survey to; level 3 to 5 students on particular programme, academics in identified programmes or schools, and identified professional service teams. 

Any questions or concerns please contact Jim Turner.


Blog Post: Automated Archiving and Deletion of Unused Panopto Videos (Staff)

We’re changing the way that recordings are stored in Panopto.

If a recording is not viewed by anyone for two years it will go into archive mode.

Archived recordings can be restored by any Panopto user with the link to the recording, or from the search page. Restored recordings will automatically be made available for viewing again within 48 hours.

Creators will also have access to an “Archive” list, similar to the Recycle Bin, where they can review all their archived content and restore it for viewing if they wish.

Attempting to access the recording before the restore has completed will display a countdown to its availability for any user accessing the link.  If “Email me when sessions finish processing” is switched on in the requester’s Panopto notification settings, you will receive an email when the recording is ready to view again.

Here is more information about restoring an archived recording

The archived recording will be automatically deleted from the archive folder 1 year after it was placed in this folder.

If you’ve recorded content that hasn’t been watched and you are concerned that this might be deleted after 3 years, all you have to do is restore the recording and watch part of it.