Blog Post: 3 ways to use rubrics for assessment

Rubrics are a great way to apply consistency to marking and also save you a ton of time. But understanding how they work can get confusing pretty quickly.

Here are 3 different ways to use rubrics, starting off at the simplest.

Option 1 – Criteria with free-form comment

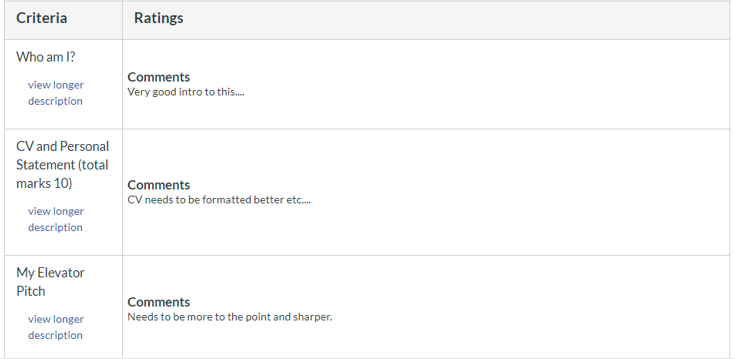
This is the simplest way to use a rubric, and a great way to start out using them. You set different criteria for assessment such as grammar, formatting or spelling for example. Then when marking, you will add a single free text comment to each one. You give a grade in the usual box for grading and that’s it. Students see your comment for each criteria.

Screeenshot showing three criteria in a rubric with free form comments as a student would see it.

#Tip: you can save your comments for re-use.

#Tip: you will naturally build a bank of responses that can be used in more complex future rubrics.

How do I set this up?

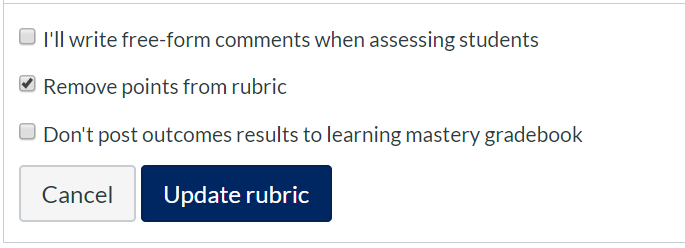
In the rubric options, select the following options:

  • I’ll write free-form comments when assessing students
  • Remove points from rubric
Screenshot of the settings for option 1. Showing the permission to add free-form comments when assessing students and remove points from a rubric.

#Tip: you can still use scores alongside free-form comments if you want to. Just deselect the ‘Remove points from rubric’ option

Option 2 – Introduce individual ratings for each criteria

Instead of writing free text comments, we can take advantage of ratings, which are clickable boxes, to indicate gradations within each criteria. There are still no scores associated with this, it’s just a way of quickly selecting prepared text comments aligned with a particular rating.

A screencapture of a rubric, showing a single criteria, and ratings. The ratings include excellent, needs more work and poor.

#Tip: Add the grade for the assessment in the usual final grade box

How do I set this up?

In the rubric options, select the following option only:

  • Remove points from rubric
The option to remove points from a rubric within the rubric settings.

Option 3 – Introduce scores for each criteria and use a total score

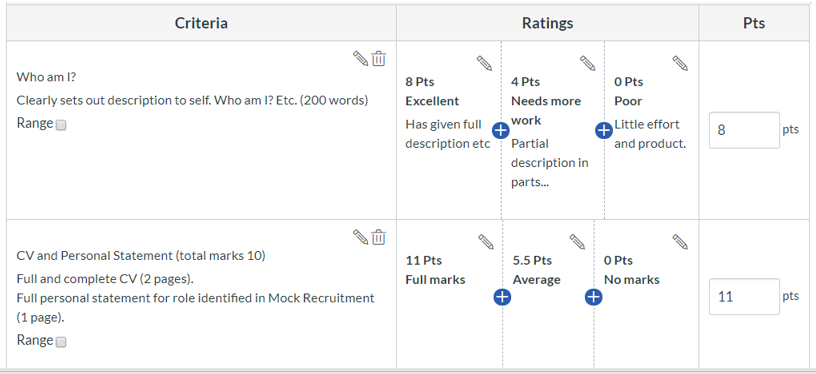
Now we’re cooking! With the addition of scores for each criteria we can start to build towards quick and consistent application of grading. It will total your scores for each row and then apply this to the overall grade for the assignment.

An image showing a rubric with two criteria. The rubric includes three ratings, excellent, needs more work and poor. It also shows that each of these criteria have a number of points listed against them.

How do I set this up?

In the rubric options, select the following option only:

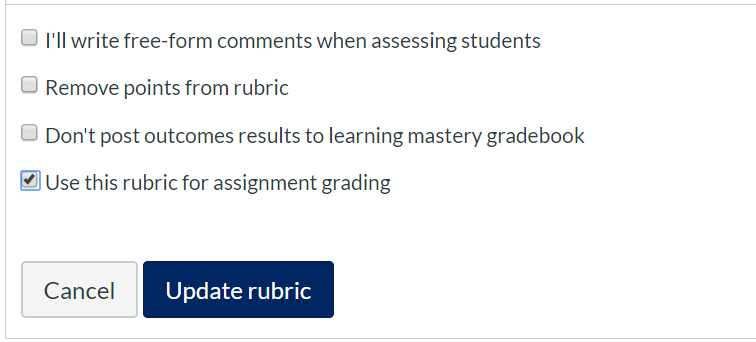
  • Use this rubric for assignment grading
A screen capture of the rubric settings, specifically highlighting the 'use this rubric for assignment grading' option.

#Tip: You don’t have to automatically apply the totalled scores as the final grade. You can just use these scores to guide you to a manually inputted final grade. In that case deselect all options.

#Tip: Instead of using single values for each rating, you can use a range by checking the box in each criteria row heading.


Blog Post: Turnitin Emergency Maintenance Window

On April 30, 2020, Turnitin will require an emergency maintenance window from 0800-1300 BST as one of our third-party network providers is performing maintenance on their circuits. During this time, there may be an interruption to our services. This may not require the full window, but we ask that you plan for the full duration.  

As mentioned on the status page, during the maintenance there may be an interruption to service, but the system will not be completely unavailable. 

We cannot guarantee this but based on previous experience, staff and students shouldn’t see an outage. They may experience some slowness with their submission. So, this will likely result in a degradation of service, not an outage. However, as a matter of caution we have released the following recommendations and guidance below. 

Possible effects: 

Submissions through the Canvas Plagiarism Framework (the new integration).  

If a paper is submitted during this period it may not be passed on to Turnitin to create a report. In which case you will find this icon in the Speedgrader. Both staff and students can click on the button below it to generate the report, after the period of maintenance has passed.  

Speedgrader interface showing the waiting icon and the Resubmit to Turnitin button 

Image of Speedgrader interface showing the waiting icon and the Resubmit to Turnitin button 

Integrations through LTI 1.3 (the old direct integration) 

This integration is the not recommended by the LJMU TEL team (read TEL Review of Online Feedback Systems). We have not closed this service since some staff are still using it.  

  • The effect will be that students can’t submit during the period. We suggest you move any deadlines that are due near or during this maintenance period. 

  • The effect on staff will be that they will not be able to mark during this maintenance period. 

Support 

Check Turnitin status for updates.

Turnitin has a System Status page where they automatically display any disruption to their service. This can be a useful site to check if you are having any issues with Turnitin or are planning something specifically related to Turnitin, in a particular time frame.  

TEL queries (Panopto, Turnitin) submit a ticket via LJMU HelpMe

Recent previous maintenance dates

The most recent maintenance dates:

  • April 22, 2020


Mobile OneNote Study Guide for Students

OneNote explained

OneNote is probably the most powerful study tool you haven’t heard of. You can use it to structure your revision or essay using a range of tools that make it easy to keep track of your studies.  

OneNote is a digital note-taking app that provides a single place for keeping all of your notes, research, plans, and information — everything you need to remember and manage in your life at home, at work, or at school. 

In OneNote, notebooks never run out of paper. Notes are easy to organize, print, and share, and you can search and find important information quickly, even if you forget where you’ve originally captured it. Best of all, your notebooks are stored online so you can easily get to them on any of your mobile devices. 

Not convinced – Listen to this quick overview video by a university student: Using OneNote Basics for students.

How to download and install it on your phone. 

Install on iOS – iOS OneNote help page.

Install on Android – Android OneNote help page

You already have an account – sign in using ‘username’ @ ljmu.ac.uk and your LJMU password. 

How it can be used: Carrying out research and background reading 

You may have been asked to research and write about a topic. This will involve you downloading academic papers or documents, reading webpages and making notes to help you structure your developing knowledge. As this work develops you may also want to identify, collate and categorise notes you have made.  

Getting your notes into OneNote is one thing, but the true value of note-taking is being able to retrieve that information, at will, when and where you need it. With OneNote your notes are searchable. You can also tag your notes with ready-made tags or create custom tags of your own to easily find specific notes. OneNote will even search the text within images (OCR) and within handwritten notes (if they are legible, that is). You can also make audio notes or use speech to text to write in OneNote. 

OneNote Guides: Taking Notes 

OneNote Guides: Stay Organised 

Here is a useful video titled OneNote Take Tips for Students, which also give you a few ideas of how useful this process is.

Yes, you can draw on your notes too 

Often text is not enough to get your point across. With OneNote, you can easily add text, images, audio, video and digital ink to any page.  OneNote also uses an infinite canvas that lets you expand, at will, to add more notes as you need.  

OneNote Guide: Drawing 


Blog Post: Tips and guidance for effective online meetings

This guide suggests good practice in organising, running and participating in an online conference or webinar drawing from a wide variety of sources. If you follow these tips you will hopefully have a far more productive online meeting, possibly even more productive than physically meeting, regardless of the tool you are using. 

These tips are to help you with your departmental or team meetings rather than with delivering online teaching. For a guide on online teaching please see our guide: Tips and Guidance for effective online teaching, seminars and tutorials.

Organising and delivering your online meeting

It is important to consider a number of things prior to creating the meeting. 

#Tip 1. What’s the best format for this meeting?

Is an online meeting really the most appropriate mode of delivery? Not all discussions and shared actions require a meeting to reach a decision. If the meeting is simply to disseminate information, this would be better via a different online process. For instance, more creative meetings that require quick-fire conversations between the team can be harder to achieve online, it might be easier to get attendees to consider the options and explain them in the meeting rather than doing all of the thinking in the moment. 

#Tip 2. Make the meeting notes together

There is additional software that you can use to help all those attending to make joint meeting notes. This link could be shared with attendees prior to the meeting and action points noted in the document as the meeting progresses. For instance, you could create a new Word or Excel document in office365 and share this to the meeting attendees and encourage them to make notes together. This means after the meeting everyone has a clear and shared understanding of what was decided. How to share a Word or Excel document.

#Tip 3. Chair your meeting effectively

Physical meetings can descend into chaos if everyone is trying to speak at once. This is even more important in an online meeting as there are less social signals which indicate who wants to talk next. Open the floor up to questions or discussions but ask each person to talk for example: “can I here from Jim first”. 

Participating

#Tip 4. Turn up early and organised

You don’t have to physically attend the meeting, but you do need to have your equipment ready, and any software installed. It is good manners not to be late for a physical meeting, but it is also good manners to not spend the first 5 minutes of an online meeting downloading software and checking your microphone. Make sure you are in a space where you can minimise distractions, for yourself and other attendees. You might want to consider telling anyone else in the immediate vicinity that you will be on the call and not to distract you. Face towards a window not away from one. This will help other attendees see your expressions during the meeting. 

#Tip 5. Mute your microphone

If you are not speaking, mute your microphone. This will reduce background noise, and reduce any embarrassment if someone walks into your room.

#Tip 6. Signal your agreement rather than just say it

If you can all see each other in a meeting there is no need to speak that you agree with someone, just a thumbs up in the chat space, or visually on screen.

#Tip 7. Wait to be asked to contribute

Don’t interrupt other speakers. This can cause one of those awkward moments where you will end up waiting and then both talking at the same time. Hopefully, the convenor of the meeting will organise the order of the speakers and prevent the need for you to jump in over someone else. A good idea if you can visually see each other is to simply raise your hand and wait to be asked to contribute. 

Useful External Links


Keep Assessing with Canvas (Staff)

In light of the current public health situation, alternative assessment is required for any assessment strategy that requires face to face contact.  This includes invigilated examinations and presentations. This blog post makes recommendations for alternative assessments, via Canvas. 

We understand that you may have developed sophisticated assessment and feedback practices that, in normal circumstances, work well. However, we would like you to carefully think through the design of alternatives to minimise complexity for both you and your students.  This could save you and your students unnecessary time, effort and frustration over the coming months. 

Canvas Assignment Settings

Our key recommendation is to use the Canvas assignment tool for students to submit an individual file to Canvas, which is then marked by an individual marker, providing them with appropriate feedback and a mark.  This is the main guide for creating a Canvas Assignment link in your course.

In addition to this, we also make the following recommendations

Limit submission types: File Uploads

When creating your assignment, select File Upload submission. Use ‘Restrict Upload File Types’ and specify your preferred formats. 

You should restrict submitted files to a common file type. Common file types include pdf, doc, docx, ppt, pptx, xls, or xlsx. This ensures that you are able to access file submissions once they have been submitted. As there are numerous ways to create text-based files using online editors, restricting the file type ensures you will be abled to read the file on your computer.

Don’t use Turnitin for marking

We recommended Turnitin should only be used in conjunction with the Canvas assignment tool to monitor any possible academic impropriety. Please set this up using the Turntin framework guidance. The advice is to not use Turnitin for marking.  We have experienced a number of problems with Turnitin during very busy periods. This has resulted in some students unable to submit work and tutors being unable to mark.  In some cases when using Turnitin, students have been unable to submit or tutors unable to mark. Conversely, there have been no such problems with Canvas.

Allow submission after due date

Allow submission after deadline to support students who have problems accessing IT or the internet. These submissions will be noted as ‘late’ in Canvas, but will facilitate a more permissive approach to granting extensions during this difficult time. Do not apply an ‘until date’ to your assignment.  

Anonymity

Please read through the Anonymous Marking Policy and make an informed decision on how feasible this is in this particular assignment and under the current circumstances. Here is a guide to show you how to implement anonymous marking

Why are we suggesting these approaches?

  • Keep it simple: We want to keep the process as simple and reliable as possible for you and your students. This is not the time to learn complex technologies and processes. We believe that redesigning an assignment, rather than trying to leverage complex technologies or novel approaches to replicate existing approaches, is time well spent. Hopefully this will reduce stress for both you and your students. 
  • Ease of access to support from the Teaching & Learning Academy and Canvas: Both the support provided by the Academy and that offered through Canvas 24/7 support is more effective if your marking processes align with normal use of Canvas/Speedgrader. Assistance for novel and unfamiliar technology is more complex, particularly when face-to-face support is not appropriate.  
  • Do the best you can: We understand that some processes will be new and different for you and your students. However, we are trying to simplify things for you in order to support you and your students more effectively over the coming months. 

Help and Support

Canvas experts and the TEL team are available to help answer your questions. Use one of the following methods to get in touch:

  • Visit canvas.ljmu.ac.uk and use the help icon in the main menu to Chat to Canvas support, submit a ticket or call a Canvas expert. Support is available 24/7. All Canvas queries should be logged with this service, in the first instance. 
  • For other TEL queries (Panopto, Turnitin) submit a ticket via the LJMU helpdesk .

Further Information

You can find further information about assessments during the suspension of face to face teaching on the LJMU Academic Registry pages: Alternative assessments and COVID-19.


Blog Post: Using Video in Assessment – Which option is best? (Staff)

Creating video and audio recordings for teaching and learning can provide students with a chance to work in a different format, develop valuable new skills, and is an opportunity for reflection. But if you’ve never done anything like this before it can feel like a daunting process. 

Make sure you give yourself time to understand the different options, and time for your students to try out the process before making their final submission. 

A key process in the success of any of these activities is to confirm what equipment your students have and their level or access to the internet. 

There are lots of different options and in this blog post we will discuss the different routes and the pro’s and con’s of each:

Uploading Video to Canvas (Computer)

Students can upload video content to either the discussion board or the assignment area.

Pros

  • It is relatively easy to do: It is pretty easy to make a recording on a phone or computer and add it to a Canvas assignment or discussion board. 
  • It is easy to mark: The video can be played easily within Canvas, feedback and a mark can be provided within Speedgrader. 

Cons

  • Files can become large: The longer the presentation, the more file space on your computer it will take up. This will become a problem as the space allocation for uploading a video into Canvas is limited, read Canvas File Quotas. The recording should not be more than 5-6 minutes long. Any longer and the video might not be able to upload.  
  • It only records the student: This process doesn’t record the screen or any PowerPoint slides, these would have to be added as an additional PowerPoint file when uploading to Canvas. 

Student Guide: Creating a Video in Canvas

Uploading Video to Canvas (Mobile)

Students can upload video content to either the discussion board or the assignment area via their mobile. This involves downloading the Canvas Student app onto their device.

Pros

  • It is relatively easy to do: It is pretty easy to make a recording on a phone or computer and add it to a Canvas assignment or discussion board. 
  • It is easy to mark: The video can be played easily within Canvas, feedback and a mark can be provided within Speedgrader. 

Cons

  • File size on the phone: If the phone has limited file size because there is already a large amount of data stored on the phone, this will make it difficult for the student to make a video. They may have to delete files or make the video in a number of smaller uploaded sections rather than in one long recording. This is why having a graded discussion rather than a single assignment submission may be easier as the student could complete the process with a sequence of recordings.
  • Files can become large: The longer the presentation, the more file space on your computer it will take up. This will become a problem as the space allocation for uploading a video into Canvas is limited, read Canvas File Quotas. The recording should not be more than 5-6 minutes long. Any longer and the video might not be able to upload.  
  • It only records the student: This process doesn’t record the screen or any PowerPoint slides, these would have to be added as an additional PowerPoint file when uploading to Canvas. 

Student Guide: Video Recordings via the Canvas App

Recording Video in Panopto (Computer)

Students can record video and upload it to a Panopto assignment.

Pros

Cons

  • Can sometimed be complex to install: Panopto installation can be problematic depending on the computer and its operating system. But there is now a new method or recording vide via the Web. Try the new Panopto Capture tool to record video.

Student Guide: Submitting a Panopto Video

Uploading Video to Panopto (Computer)

Students can upload previously recorded video content to a Panopto assignment.

Pros

  • Students don’t have to install the Panopto software: With this option student can use alternative software to record the screen. For instance Quicktime on Macs, and Gamebar on Windows. There are other software solutions such as OBS which they can download for free. However these can still be tricky to set up. 
  • More flexibility for more experienced video makers: If your students are used to using video recording technology the flexibility this offers could engage them in more interesting and innovative video submissions. 
  • Larger file size: Students can create longer videos with larger file sizes and upload them into Panopto. Obviously, they will need file space on the laptop to do this, and need a good bandwidth to upload the file once created. 

Cons

  • Harder to support: If students are using their own choice of video recording software, they may still get installation issues, which are harder to support. There is potential for students to pool their knowledge to help each other but this could become more about learning the technology rather than learning the content. 

Uploading Video to Panopto (Mobile)

Students can upload video content to a Panopto assignment from their Mobile device. Students are required to download the Panopto app onto their device.

Pros

  • Installation is simple: Students will find it easier to download and create the recordings.

Cons

  • File size on the phone: If the phone has limited file size because there is already a large amount of data stored on the phone, this will make it difficult for the student to make a video. They may have to delete files or make the video in a number of smaller uploaded sections rather than in one long recording. This is why having a graded discussion rather than a single assignment submission may be easier as the student could complete the process with a sequence of recordings.
  • It only records the student: This process doesn’t record the screen or any PowerPoint slides, these would have to be added as an additional PowerPoint file when uploading to Canvas. 

Student Guide: Submitting a Panopto Video

Create a narrated PowerPoint (Computer)

Students can upload video content to a Panopto assignment from their Mobile device. Students are required to download the Panopto app onto their device.

Pros

  • Files can become large: The longer the presentation, the more file space on your computer it will take up. This will become a problem if your computer has limited file space or if you want to email the file. Large files will also take longer to upload into Canvas. Make a test recording to see if you have file space, and to test the size of the file. 
  • You cannot record a video of yourself talking: This process only creates a recording of your voice. If you need to record a video of yourself you need to consider a different process. Contact your tutor for further guidance.
  • Don’t talk over any slide animation: If you are using slide animations the audio will not be recorded during the animation. You need to talk before or after each anim

Cons

  • You can record each slide at a time: You can record over each slide individually. This allows you to think clearly and compose yourself before making each slide recording. 
  • It captures any drawing or highlighting you might make on the slide: When you are making the recording you can use the presentation drawing tools to highlight or draw on the slides. This can be useful if you want to draw attention to a particular area of the slide when speaking. This will be recorded so the viewer will see what you have underlined

Student Guide: Making a Narrated PowerPoint

Hopefully we have cleared some things up, and why a particular route would be more beneficial to you. If you would like more advice about Panopto, get in touch with the Technology Enhanced Learning team via LJMUHelpMe.


Blog Post: Conferences in Canvas

If you are using ‘Conferences’ in Canvas please note that they are not part of the recommended practice that TEL team have provided for staff for remote/distance teaching. The details of which can be found here ‘Keep Teaching with Canvas’

Conferences have a ‘soft’ limit of ten users. Any more users than this may result in reduced quality of the session and some users may not be able to access the session. Please note that any recorded Conferences will be unavailable after 14 days.

Read more guidance regarding What are Conferences?


Blog Post: A simple example of individual online seminar activity

Overview

This blog post contains a simple process for moving seminar activities online. We anticipate that you will already have learning activities for your remaining seminars. These probably will have been intended to be delivered verbally, with the possibility of accompanying printed documents. They may also have been intended for small group work and wider discussion. We want you to adapt these to be delivered online and to be completed individually by students in their own time over the coming weeks. This document contains a basic method for doing this. If you have any issues with this process please raise a helpdesk ticket via LJMU HelpMe.

Why we are suggesting this approach?

Keep it simple: We want to keep the process simple and as flexible for you and your students. We don’t want you to have to learn complex technologies and processes in isolation such as webinar tools. We also want to allow both you and your students’ maximum flexibility in when and how you teach and learn. We hope that this will reduce stress for both you and your students. 

Individual v group activities: Group activities can be complex to manage online, and if you are unfamiliar with this delivery method we would suggest it may be easier to redesign the activity for an individual to complete. It also maximises the flexibility for student learning. 

Size of your class: With small groups (<40 students) online activities are easier to organise. However, for the inexperienced online tutor, running online events via webinars or in online discussions can be daunting. More details about large and small groups will be included below. 

Do the best you can: We appreciate that many of the activities may have included physical object or access the equipment that is not available online. In these cases, we would like you to be inventive with the thinking through to possible alternative resources available on the internet, or that you could create yourself. Do the best you can, we understand there may not be equivalents. 

Creating your activity

Here are a number of steps for creating the online activity that you can use as guidance. 

Design your activity

Think about the activities that you were going to run in these seminars. Imagine that you are delivering these to one student via the internet. This will help you focus on how to design effectively and then scale this up for your whole class. 

Instructions: What would you need to tell them to do? Write out the instruction carefully and also consider making a Panopto video of yourself taking them through the instructions. Try and keep the instructions as simple and as clear as possible. If the students read them and don’t know what you mean they can’t ask for clarification as they would do in the class. It is also best practice to state how long the task should take, and a statement on the purpose of the activity, such as ‘what they are learning and why’ to help motivate the student.

Resources: What resources will they need to support them? A resource can help them extend their knowledge and bring a greater richness to the online experience. What is available online, via the library, in resources such as BoB and youtube. What could you create yourself, e.g. making your own video via Panopto? 

Task: What would you expect students to have completed by the end of the activity? Do they have to complete a question sheet, write a short summary paragraph, or identify key issues in a case study?

Follow up: What feedback would you provide the student? Think about the feedback you would normally provide after the activity, would this be in the form of a model answer with links to further resources, would it be collecting one or two questions from students and answering them to the whole class?

What would be the best way to capture the completed task and your follow up feedback online? 

  • Online test: These are good for large classes because you can release the feedback for students once the activity is finished. For instance, students can type a short answer into a question-answer box, and a model answer created by you can be released automatically to allow the student to continue their study. 
  • Online assignment: students can use this to upload a completed answer sheet and you could view a small number and provide a summary for the whole class via an announcement.
  • Discussion board: This is good for small groups where there is a good level of trust between them, students can raise questions and points and you can either encourage a discussion or provide answers. 
  • Individual canvas journal: This is good for small groups students can raise questions privately and you can choose to answer them privately in turn or provide a summary via an announcement. 

Putting your design on Canvas

Now you have completed the design stage, you will need to put the activity on Canvas and release it to the students. This could be in the form of an uploaded document, a series of announcements. Here is a recommended method.

Create a Canvas page in the Canvas course and include:

  • Name the page after the title of the activity
  • Purpose: what they are learning and why
  • Time: how long to complete the activity e.g. (30 mins)
  • Instructions: Instructions to complete the activity
  • Resources: Links to any resources needed to complete the activity
  • Follow up: How and when you will provide feedback on the activity. 
  • Additional support: how you would prefer them to contact them with queries or additional support on this task, e.g. direct email if it is a small class or FAQ discussion board for a larger class. 

Publish the page and create an announcement linking to the page, and add it to the modules area, or a link from the home page. 

Encourage and monitor engagement

There are a number of useful processes to encourage and monitor engagement

You can use the grades area to send an email to students who have or haven’t submitted. Find out more by reading How do I send a message to students from the Gradebook.


Blog Post: Simple Tips to Improve the Quality of your Video Recordings (Staff)

This post provides you with some tips on how to quickly improve the quality of any video you are creating to present you in the best light!

Tip #1: Planning

Plan out your presentation. If you are going to be using different resources or artefacts plan how and when you intend to bring these into your video. Work out timings for each part of your video and run through it a few times to check timings and practice.

Tip #2: Audio

The sound quality of video recordings can often be more important than the visual quality. If you are delivering a spoken message but the viewer cannot hear or understand your words the message will be lost. You might be capturing your sound from a microphone built into your laptop or from a webcam, but try to carry out your recording in a quiet location. If needed close windows and doors to keep out unwanted noise and distraction. Position your microphone/ computer near to where you are sitting or standing. Try out a draft recording to check that everything is audible. There may be some hiss and background noise, but as long as your words are decipherable this will be enough.

Tip #3: Framing your shots

Videos (or photographs) look good if they follow the ‘rule of thirds’. If you look at the image from your camera on the viewfinder or live preview, the eyes of your subject should be roughly two-thirds of the way up the image. Angle or elevate your webcam to achieve this, such as on a stack of books.

Eyes should be roughly be two-thirds of the way up the image

Very often, such as for interviews, or to add some extra ‘paz-zazz’ to shots, the subject of the photography also position themself to two thirds of the screen and leave a third of the frame empty to feature some other aspect as in the image below.

Position yourself to two thirds of the screen

Try to be quite close to the camera to produce a video that looks good on the web, where frame sizes on-screen are often smaller, with greater potential to create an emotional connection with the audience. When you watch TV, particularly the news, look out how people are framed and you will see that they follow the same rules.

Tip #4: Lighting (a big one but worth doing)

If you are planning to capture the video feed from a camera, even if you are using a very low-fi setup such as a basic webcam a couple of simple measures can dramatically increase the quality of the video.

Think about how you can lay out your recording setup so that the subject of the video is positioned in such a way that the main light source falls onto the subject and then back into the camera lens. The main strongest light source is often natural light, and have your subject (or yourself) face towards this light source. Now position the camera in between the subject and the light source, so the light re-bounds off the light source and back into the camera. Often it’s a case of sitting at a table looking towards the light with a webcam at the opposite side of the table facing you.

In professional photography the main light is called a ‘Key’ light, and ideally there would be two further light sources: the ‘Fill’ light, and the ‘Back’ light. If you take a look around your recording room, you may be able to provide these additional light sources with little extra effort, often just turning on all available electric lighting is enough.

(Originally written by Will Moindrot)


Blog Post: Canvas Dashboard Views Explained

Your Canvas dashboard is the first page you see when you login. There are three different views which can be enabled depending on how you would like information to be displayed.

Card View

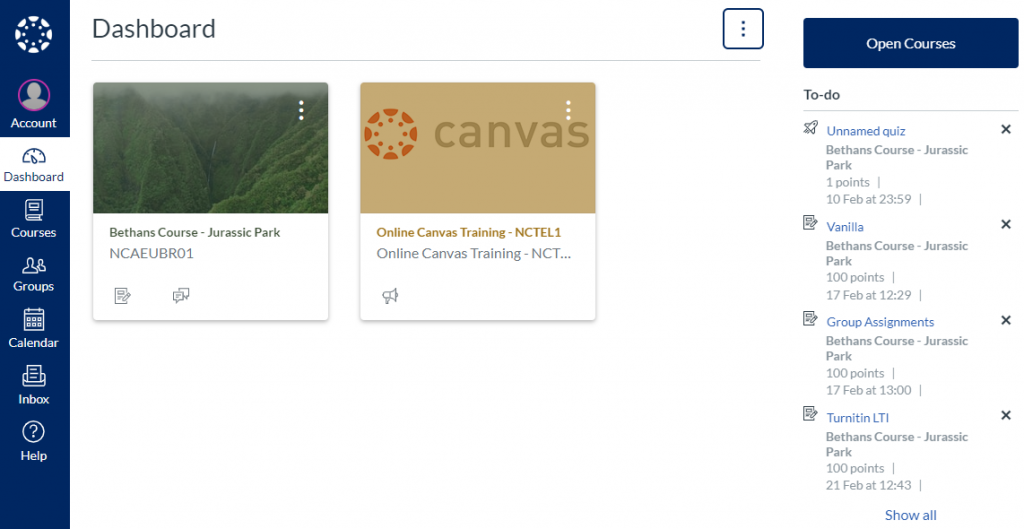
This is probably the most useful view, and shows your course enrolments as separate cards. You can favourite courses so that they appear on your dashboard – this also means that you can also remove old courses by removing the favourite option. The card view dashboard also displays items in your To-do and recent feedback and grades.

New notifications appear at the bottom of the card, alongside notifications for announcements, assignments and discussions.

We recommend this view to get the most out of your online Canvas experience.

Below image displays your Canvas Dashboard in Card View.

This image displays your Canvas Dashboard in Card View

Favouriting Courses

To favourite your courses:

  • Click on the Courses icon in the main menu
  • Click on All Courses
  • Select the courses you want to favourite by clicking in the star

List View

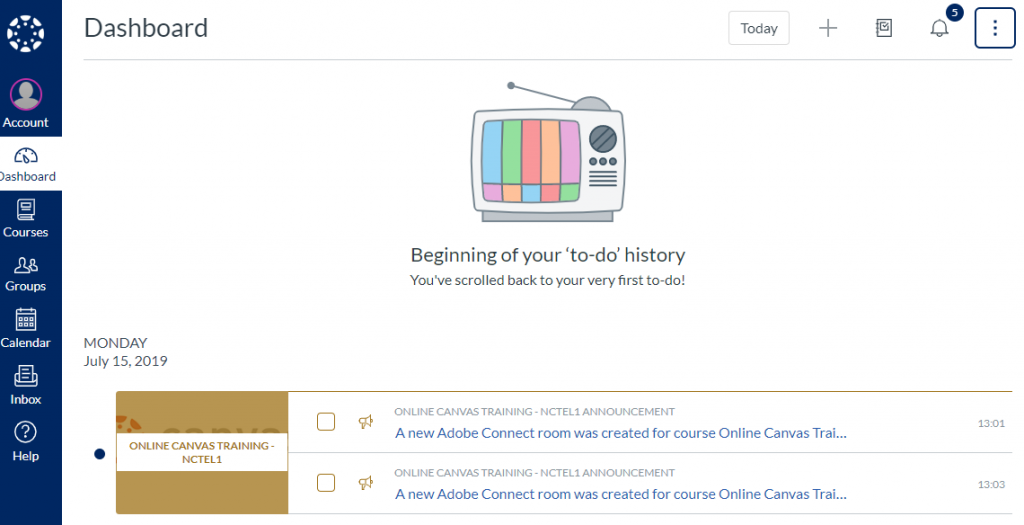
List view displays all course to-do items in chronological order. It allows you to add new to-do items to your list and view your grades. Today’s items appear first, but if you scroll up you will notice previous activities.

Below image displays your Canvas Dashboard in List View.

This image displays your Canvas Dashboard in List View

Recent Activity

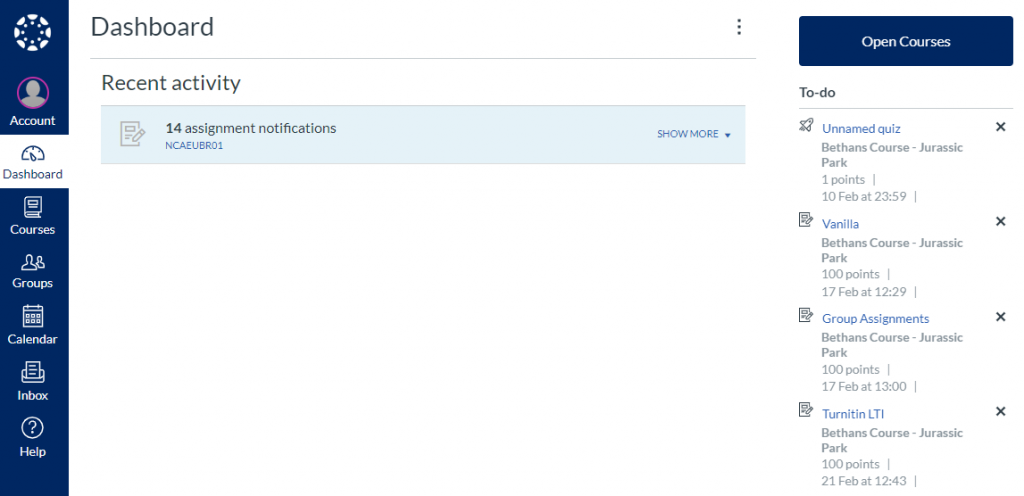
This view displays all recent activity for all courses, displaying notifications for any assignments or discussions you have participated in. There’s also a panel that allows you to see your To-do list and recent feedback and grades.

Below image displays your Canvas Dashboard in Recent Activity View.

This image displays your Canvas Dashboard in Recent Activity View

To Change your View:

Click on the options menu (the one with the three dots) when viewing the Dashboard page and select your new view. You can change your view at any time.