We’re committed to making digital content accessible to as many people as possible at Liverpool John Moores University. This article is one in a series of accessibility tips to help you improve the digital environment for everyone. We would like you to adopt these tips as part of your practice.
There are some simple steps you can take in Word documents or web pages like those in Canvas to make your content accessible.
Accessibility checkers are a great way of ensuring your digital content complies with accessibility regulations and guidelines. Whether you’re using Word or Canvas, these tools are easy to use; they highlight concerns and tell you how to fix them. Using an accessibility checker only takes a few minutes and makes an enormous difference to someone using a Screen reader or other accessibility tool.
Word Accessibility Checker
You’ll find an accessibility checker in Word which allows you to double check your content is following best practice and accessibility guidelines. Ensure you use it before converting documents to PDFs or uploading it to Canvas. Canvas has an accessibility checker, but it checks your Canvas pages, not the content of the files you upload. It’s important you ensure your files are accessible before you upload them to Canvas.
Both Office 365 (which works in the browser) and the desktop version of Word have an Accessibility Checker, but more information about why errors are reported and steps to help fix the error are available in the version on your desktop. The following images are from the desktop version of Word, and we would recommend you use this version to check your documents for accessibility issues.
- Select the Review tab in Word

Review tab in Microsoft word contains the ‘check accessibility’ option
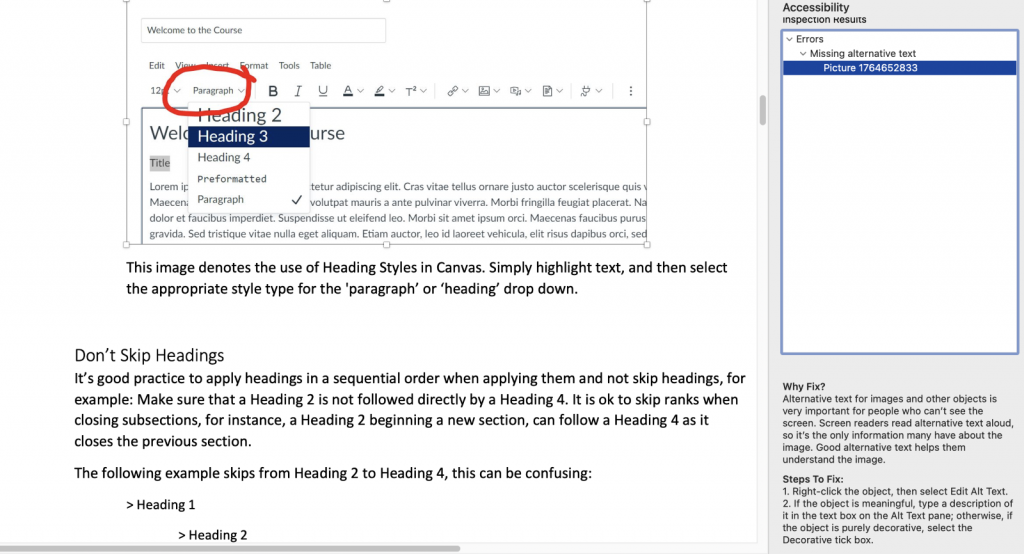
- Select Check Accessibility – the Accessibility panel should appear. View each item listed in the ‘Inspection Results Panel’. Clicking on each item which will reveal instructions at the bottom of the screen as to ‘why fix’ and ‘steps to fix’ the issue. The below image shows that an image in Word has been identified as an error. To resolve the issue, Alternative text needs to be added to the image to ensure the image can be read out loud by screen readers. Instructions are provided at the bottom of the panel.

Accessibility checker panel displays issues in the document and describes how they can be fixed.
- Continue through the issues, fixing them as you go, until all issues are resolved.
Canvas Accessibility Checker
The Canvas Accessibility Checker has recently received a few updates. It’s a useful tool to ensure your Canvas pages adhere to accessibility regulations and guidelines. Canvas’s accessibility checker will not check any files you upload for accessibility issues, you will need to use the accessibility checker in the program where you created file e.g. Microsoft Word.
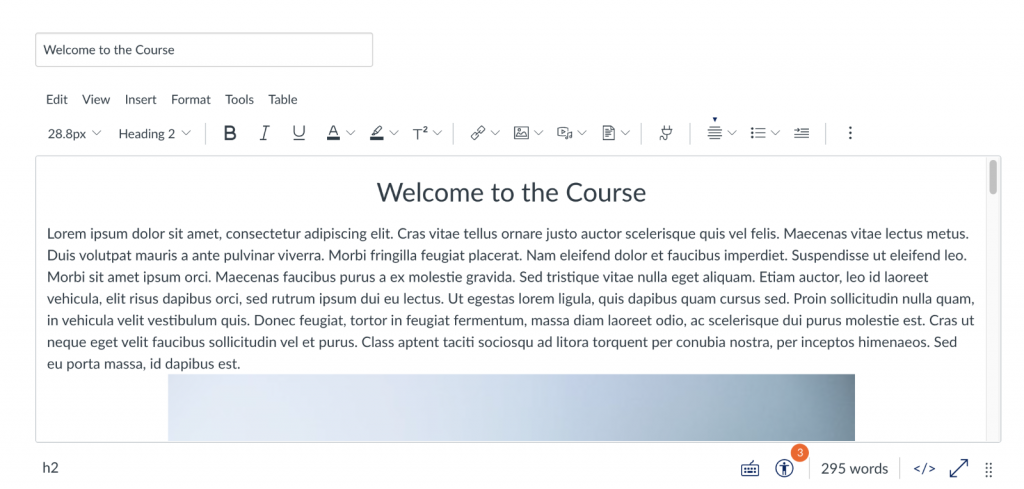
When editing a Canvas page, take a look at the icons running along the bottom below the Rich Content Editor panel.

Canvas accessibility checker appears underneath the visual text box editor.
The accessibility checker icon appears below the rich content editor and appears as a person in a circle:

Accessibility Icon
The checker in this case has already identified three issues with the content.
- Click on the accessibility checker to open the side panel

Canvas Accessibility Checker Side Panel highlights any issues with your page
- Here the checker has identified adjacent links with the same URL. It offers a ‘Merge links’ option to resolve the issue. Click the ‘Apply’ button to save changes before proceeding to the next issue.
- The question mark that appears next to the identified issue allows you to read about the issue. It also contains additional links where you can find out more about the highlighted issue.
A note about tables
Tables can be used in a variety of ways; some tables are used to disseminate tabular information, such as a data set, or list information. Sometimes tables are used to change the layout of a page, allowing you to add hyperlinked text or images in each cell to create a fixed menu. You may find that your table has been flagged as an issue.
Layout tables should be avoided where possible and content should be added in-line. It will make your content much more accessible, inclusive and responsive. Responsive is a term used to signify the adaptability of a page across all devices, tablets and smartphones. It’s much easier for a user to view a responsive page on any device and zoom in on content – which is a particular benefit for users with visual impairments. If you currently use tables to enhance the design of your course, you might want to rethink this strategy and use the structure within the ‘Modules’ section of your course to disseminate and navigate information.
If you’re using a table for tabular data or a data set, accessibility regulations require ‘Header cells’ to be marked up and a caption to help identify the overall topic of a table. A header cell is the title for the column or row that helps identify the purpose of all the corresponding cells. Use the Canvas Accessibility checker ‘set table header’ tool to identify whether the row or column (or both) includes header information.
Further Information
Guide to using the Microsoft accessibility checker
Guide to using the Canvas accessibility checker
Tables Accessibility Information
Accessibility in Digital Education Design Project (AiDED)
The Teaching and Learning Academy’s AiDED vision is to use the digital learning environment to help all our students improve their life chances. Find out more about accessibility and the AiDED project over on our AiDED Project page.

